Archive: August 27, 2025

nikon d750 user manual

The Nikon D750 user manual is a comprehensive guide essential for understanding and mastering the camera’s features. It covers basic operations, advanced settings, troubleshooting, and maintenance, helping photographers of all levels unlock the D750’s full potential. The manual is available online, ensuring easy access to detailed instructions and firmware updates.

Overview of the Nikon D750

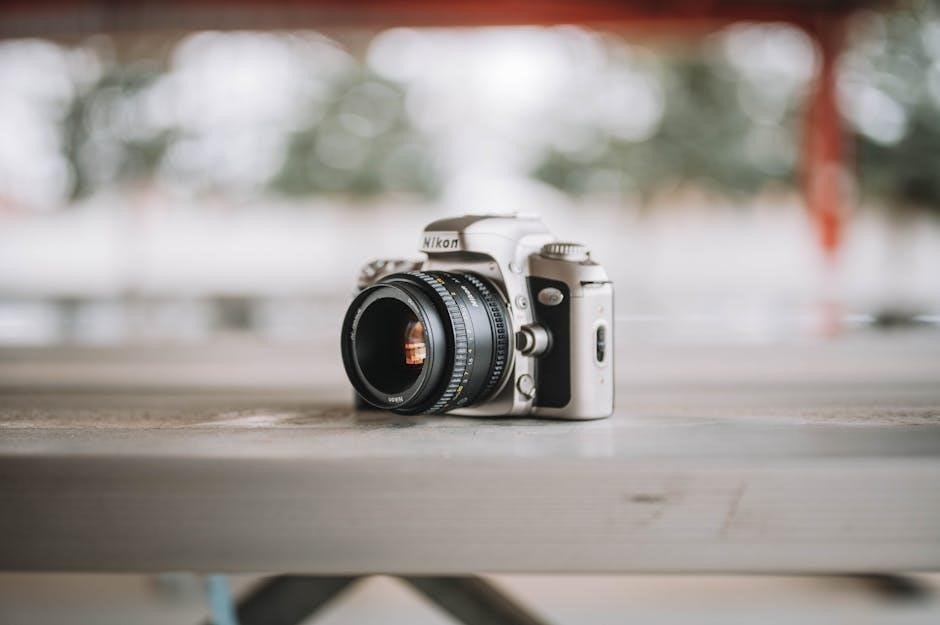
The Nikon D750 is a high-performance DSLR camera designed for both professional and enthusiast photographers. It features a 24.3-megapixel full-frame CMOS sensor, delivering exceptional image quality with rich detail and vibrant colors. The camera is known for its durability, ergonomic design, and weather-sealed body, making it suitable for challenging shooting conditions. With advanced autofocus, metering, and video capabilities, the D750 excels in various photography genres, including portraits, landscapes, and action shots. Its compatibility with a wide range of Nikon lenses and accessories further enhances its versatility, making it a reliable choice for capturing stunning images and videos.

Key Features of the Nikon D750

  • The Nikon D750 features a 24.3-megapixel full-frame CMOS sensor, delivering high-resolution images with excellent detail and color accuracy.
  • It includes the EXPEED 4 image processor, enhancing performance and enabling fast continuous shooting at up to 6.5 frames per second.
  • The camera offers an ISO range of 100-12800 (expandable to 50-51200), ensuring excellent low-light performance.
  • The 51-point autofocus system, with 15 cross-type sensors, provides precise and quick subject tracking.
  • Full HD video recording at 1080p/60fps makes it suitable for professional-grade videography.
  • The D750 boasts a weather-sealed magnesium alloy body for durability in harsh conditions.
  • Dual SD card slots allow for extended storage and backup options.
  • A 3.2-inch LCD screen and 100% optical viewfinder provide clear previews and precise framing.
  • Customizable controls enable personalized shooting experiences, catering to diverse photography styles.

First Impressions and User Feedback

The Nikon D750 has impressed users with its robust build quality, ergonomic design, and intuitive controls. Photographers praise its 24.3MP full-frame sensor for delivering exceptional image quality and dynamic range. Many highlight the camera’s weather-sealed body and reliable performance in challenging conditions. The 51-point autofocus system is frequently commended for its speed and accuracy, especially in low-light situations. Users also appreciate the camera’s video capabilities, including 1080p/60fps recording. Some note that the manual focus feature provides precise control. While a few mention a slight learning curve for new users, overall feedback underscores the D750 as a versatile and reliable choice for both enthusiasts and professionals.

Essential Components and Controls

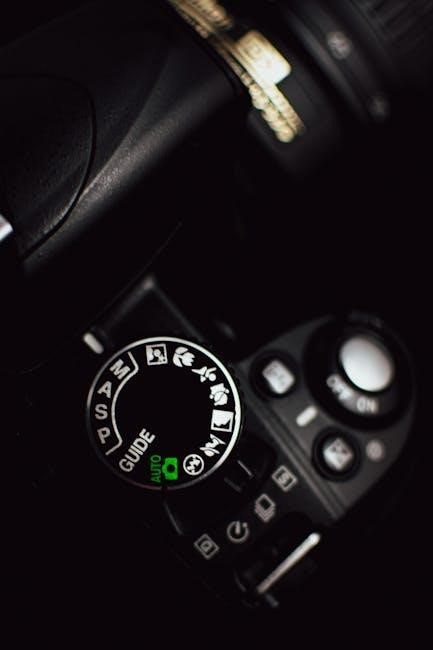
The Nikon D750 features a mode dial, customizable buttons, and intuitive navigation, allowing photographers to efficiently adjust settings and access key functions during shooting sessions.

Understanding the Camera Layout

Understanding the Nikon D750’s layout is crucial for efficient operation. The camera features a mode dial on the top-left, allowing quick access to shooting modes. Customizable buttons are strategically placed for easy adjustments. The LCD screen on the back provides a clear view of settings and images, while the optical viewfinder offers precise composition. The lens release button and memory card slots are conveniently located for quick changes. Ergonomic design ensures comfort during extended use. Familiarizing yourself with these components enhances control and creativity, making the D750 a powerful tool for photographers of all skill levels.

Mode Dial and Shooting Modes

The Nikon D750 features a intuitive mode dial located on the top-left side of the camera, providing quick access to various shooting modes. The primary modes include Manual (M), Aperture Priority (A/Av), and Program (P) modes, allowing photographers to control exposure settings. The dial also includes Auto modes for point-and-shoot simplicity and Scene modes for specific situations like portraits or landscapes. Additionally, the Effects mode offers creative filters for unique styles. Each mode is designed to cater to different skill levels and shooting conditions, ensuring versatility for both beginners and professionals. Customizable settings further enhance the camera’s adaptability to personal preferences.

Customizable Buttons and Controls

The Nikon D750 offers extensive customization options for its buttons and controls, allowing photographers to tailor the camera to their preferences. The Fn and Pv buttons can be assigned to frequently used functions like ISO or white balance, enhancing workflow efficiency. Additionally, the AE-L/AF-L button can be configured for autofocus lock or exposure lock. These customizations enable quick access to essential settings, reducing time spent navigating menus. This feature is particularly beneficial for professionals who need streamlined control during shoots. The ability to personalize controls ensures a more comfortable and intuitive shooting experience, catering to individual styles and priorities.

Mastering Shooting Modes

Mastering shooting modes on the Nikon D750 enhances creativity and control. Manual (M), Aperture Priority (A/Av), and Program (P) modes provide flexibility, allowing photographers to adjust aperture, shutter speed, and ISO for precise results.

Manual Mode (M)

Manual Mode (M) on the Nikon D750 offers full creative control, allowing photographers to independently adjust aperture, shutter speed, and ISO. This mode is ideal for experienced shooters seeking precise control over exposure. To use Manual Mode, select M on the mode dial and adjust settings using the command dials. The exposure compensation button helps fine-tune brightness. Live View can assist in verifying focus and exposure accuracy. Manual Mode is also a great tool for learning photography fundamentals, enabling users to experiment with different combinations of settings to achieve desired artistic effects.

Aperture Priority Mode (A/Av)

Aperture Priority Mode (A/Av) allows photographers to set the aperture while the camera automatically adjusts the shutter speed for proper exposure. This mode is ideal for controlling depth of field, making it perfect for portraits, landscapes, and creative compositions. By adjusting the aperture, users can isolate subjects or ensure more of the image is in focus. The camera’s automation handles shutter speed, providing a balance between creative control and convenience. This mode is particularly useful for photographers who want to focus on composition and lighting without manual adjustments, offering flexibility and efficiency in various shooting scenarios.

Program Mode (P)

Program Mode (P) offers a balance between automation and control, making it ideal for photographers who want the camera to handle most settings but still allow for adjustments. In this mode, the Nikon D750 automatically selects both aperture and shutter speed to ensure proper exposure. However, users can still modify settings like ISO sensitivity, white balance, and autofocus to fine-tune results. Program Mode is versatile and suitable for various shooting scenarios, from everyday snapshots to dynamic situations where quick adjustments are needed. It provides a great starting point for learning photography fundamentals while maintaining creative flexibility.

Autofocus and Metering

The Nikon D750 features advanced autofocus with a 51-point system for precise subject tracking and metering modes for accurate exposure control, ensuring sharp images in various lighting conditions.

Autofocus Modes and Settings

The Nikon D750 offers a 51-point autofocus system, providing precise subject tracking and versatility in various shooting scenarios. Users can choose between Single AF (AF-S), Continuous AF (AF-C), and Manual Focus (MF) modes. The camera also supports Group-Area AF and Dynamic-Area AF modes, enhancing focus accuracy for moving subjects. Customizable AF settings allow photographers to tailor focus behavior to their preferences, ensuring sharp images in dynamic conditions. The manual provides detailed guidance on configuring these modes for optimal performance, making it easier to adapt to different photographic situations and achieve professional-grade results consistently.

Advanced Autofocus Techniques

The Nikon D750 offers advanced autofocus techniques to enhance precision and flexibility. Back-button focusing allows for improved subject tracking, while AF-C mode excels in dynamic situations. Customizable AF settings enable photographers to fine-tune focus behavior, such as adjusting the AF tracking sensitivity. The camera also supports focus peaking in manual focus mode for precise control. Additionally, the 51-point AF system can be configured to prioritize specific focus points, making it ideal for genres like wildlife or sports photography. These features, combined with the manual’s detailed guidance, empower users to achieve sharp, professional-grade results in challenging environments.

Metering Modes Explained

The Nikon D750 offers three primary metering modes: Matrix, Center-weighted, and Spot. Matrix metering analyzes the entire scene to balance brightness and shadows, ideal for everyday shooting. Center-weighted prioritizes the central area, suitable for portraits. Spot metering measures a specific point, perfect for high-contrast scenes. The manual explains how to select these modes and customize settings for precise exposure control. Understanding these modes ensures optimal results in various lighting conditions, helping photographers achieve their creative vision with ease and accuracy.

Custom Settings and Personalization

The Nikon D750 allows extensive customization, enabling users to tailor settings to their preferences. Create custom shooting profiles and save them to memory cards for easy access, ensuring consistent results across different shoots. This feature enhances workflow efficiency and personalizes the camera to individual photographic needs.

Configuring Custom Settings

The Nikon D750 offers extensive customization options, allowing users to tailor camera settings to their preferences. Customizable buttons enable quick access to frequently used functions, such as ISO control or autofocus modes. The camera’s menu system provides detailed options for personalizing shooting styles, including metering, autofocus, and exposure settings. Additionally, custom shooting profiles can be saved to memory cards, ensuring consistent results across different shoots. This feature is particularly useful for photographers who work in various lighting conditions or specialize in specific genres like portraits or landscapes. The manual provides step-by-step guidance for configuring these settings, while the Nikon Manual Viewer 2 app offers additional support for understanding and applying customizations effectively.

Creating Custom Shooting Profiles

Creating custom shooting profiles on the Nikon D750 allows photographers to save specific camera settings for quick recall in various shooting scenarios. These profiles can be tailored to suit different lighting conditions, genres, or personal preferences, streamlining the workflow. Users can store settings such as autofocus modes, metering options, and exposure parameters directly to memory cards. This feature is particularly beneficial for photographers who frequently switch between setups, such as portrait and landscape photography. The manual provides detailed instructions on how to create, save, and manage these profiles, ensuring optimal performance in diverse situations. The Nikon Manual Viewer 2 app also offers guidance on custom profile management.

Using Custom Memory Cards

Using custom memory cards with the Nikon D750 allows photographers to save and recall specific camera settings, enhancing workflow efficiency. These cards can store configurations such as autofocus modes, metering settings, and exposure parameters, enabling quick access to preferred setups. The D750 supports saving custom shooting profiles directly to memory cards, which can be loaded whenever needed. This feature is particularly useful for photographers who work in diverse environments or switch between different styles frequently. The manual provides clear instructions on how to manage and utilize custom memory cards effectively, ensuring seamless transitions between shooting scenarios and maintaining consistent results.

Advanced Techniques and Tips

Mastering advanced techniques with the Nikon D750 involves optimizing ISO settings, leveraging custom controls, and refining autofocus precision for exceptional image quality and improved shooting efficiency.

Optimizing Image Quality

Optimizing image quality with the Nikon D750 begins with understanding aperture, shutter speed, and ISO settings. Using Manual or Aperture Priority modes allows precise control over these elements. Ensure proper lens maintenance and use high-quality glass for sharp results. Customize white balance for accurate colors, especially in challenging lighting. Enable RAW format to capture maximum detail and flexibility in post-processing. Regularly update firmware to maintain optimal performance. Experiment with custom settings to tailor the camera to your shooting style, ensuring every image meets your creative vision and technical standards.

Mastering ISO and Noise Reduction

Mastery of ISO and noise reduction is crucial for achieving optimal image quality with the Nikon D750. The camera offers an ISO range of 100 to 12,800, extendable to 50 and 51,200 for extreme lighting conditions. Lower ISO settings (100-400) minimize noise, while higher values are best reserved for low-light scenarios. Enable High ISO Noise Reduction for smoother images in bright settings, while Long Exposure NR reduces noise in long exposures. Balancing these settings ensures sharp, detailed photos without over-processing. Experiment with noise reduction levels to preserve image detail and achieve natural results, especially in high-ISO shots.

Using Live View for Precision Focus

Live View on the Nikon D750 enhances focusing accuracy by allowing precise control over your subject’s sharpness. Activate Live View via the LV button for real-time preview on the LCD. Use the touchscreen to select focus points or zoom in (up to 100%) for critical focus confirmation. Manual focus users benefit from Focus Peaking, which highlights sharp areas. For stationary subjects, enable Face-Priority AF for portraits. Use AF-S for stills and AF-F for moving subjects. Tripod use is recommended for stability. Live View ensures precise focus, especially in manual mode, helping you achieve sharp, professional-grade images effortlessly.

Video and Time-Lapse Photography

The Nikon D750 excels in video and time-lapse photography, offering Full HD recording at 60fps and interval shooting for stunning time-lapse sequences. Manual controls ensure cinematic quality and precision.

Recording Video with the Nikon D750

To start recording video on the Nikon D750, switch to video mode via the mode dial or Live View. The camera supports Full HD (1080p) at 60fps, ideal for smooth motion. Manual controls allow adjustment of aperture, shutter speed, and ISO for cinematic effects. Use the headphone jack to monitor audio and ensure high-quality sound. The D750 also features HDMI output for external recording or monitoring. Stabilize footage with handheld shooting or a tripod. Focus modes include AF-F for continuous autofocus and MF for manual precision. These features make the D750 versatile for capturing professional-level video content with ease.

Time-Lapse Photography Setup

The Nikon D750 simplifies time-lapse photography with its built-in interval timer. Access the feature via the Shooting Menu under Interval Timer Shooting. Set the interval and number of shots to capture stunning sequences. Use a tripod for stability and ensure proper focus before starting. For added control, enable Manual Mode to set exposure settings. The camera will automatically capture and save images at the specified intervals. Optional: Use the Nikon Manual Viewer 2 app for detailed setup guidance. This feature is ideal for capturing dynamic scenes like sunsets, stars, or cityscapes, allowing you to create professional-looking time-lapse videos effortlessly.

Advanced Video Shooting Techniques

Enhance your video capture with the Nikon D750 by utilizing advanced techniques. Use Manual Mode to control exposure settings precisely, ensuring consistency in varying lighting conditions. Leverage customizable buttons to assign functions like focus peaking or zebras for real-time feedback. For superior audio, connect an external microphone and monitor sound via the headphone jack. Employ back-button autofocus for smoother focus transitions during recording. These techniques, supported by the Nikon Manual Viewer 2 app, help you produce professional-grade videos with ease and creativity, making the D750 a powerful tool for videographers seeking advanced control and high-quality output.

Troubleshooting Common Issues

Resolve autofocus, exposure, and firmware issues with the Nikon D750. Reset settings, update firmware, and ensure proper lens compatibility. Refer to the manual for detailed solutions and maintenance tips.

Resolving Autofocus Problems

Autofocus issues with the Nikon D750 can often be resolved by resetting settings to default or updating firmware. Ensure the camera and lens are clean, as dirt or debris may interfere with focus. Check lens compatibility and proper mounting. Use manual focus for precise control when autofocus fails. Refer to the manual for troubleshooting steps, such as recalibrating focus or adjusting AF-C settings. Regular firmware updates and proper camera maintenance can prevent recurring autofocus problems, ensuring sharp and accurate focus in various shooting conditions.

Fixing Exposure and Metering Issues

If your Nikon D750 is experiencing exposure or metering issues, start by checking the metering mode. Switch between Matrix, Center-Weighted, and Spot metering to see which works best for your scene. Adjust exposure compensation to fine-tune brightness. Ensure the camera’s sensors are clean, as dirt can affect metering accuracy. Resetting custom settings or updating firmware may resolve persistent issues. Use the AE-L/AF-L button to lock exposure for specific lighting conditions. Experimenting with manual mode for full control over aperture, shutter speed, and ISO can also help achieve desired results. Bracketing shots ensures capturing a range of exposures for later adjustment.

Addressing Firmware and Software Updates

Regular firmware and software updates are crucial for optimizing the Nikon D750’s performance. To update, connect the camera to a computer via USB and use Nikon’s software, such as Nikon Message Center or Camera Control Pro. Ensure the camera is fully charged or powered via an AC adapter during updates. If issues arise, reset the camera’s settings or reinstall the firmware. Additionally, the Nikon Manual Viewer 2 app provides access to the latest manuals and update instructions. Always download updates from Nikon’s official website to ensure compatibility and security. Updates often improve autofocus, metering, and overall functionality.

Maintenance and Care

Regularly clean the camera’s sensor and lens to prevent dust and damage. Update firmware to ensure optimal performance and store the camera in a dry, cool place. Use protective cases during transport to maintain its condition and longevity.

Cleaning the Camera and Lens

Regular cleaning is essential to maintain the Nikon D750’s performance. Use a soft, dry microfiber cloth to wipe the lens and camera body, avoiding harsh chemicals. For the sensor, use a hand-held bulb blower to remove dust. If necessary, dampen the cloth slightly but never apply liquids directly to the lens or sensor. Avoid touching the lens surface to prevent smudges. Store the camera in a protective case when not in use and clean it in a dry, stable environment to minimize dust exposure. Proper care ensures sharp images and prolongs the camera’s lifespan.

Updating Firmware

Updating the Nikon D750’s firmware ensures optimal performance, adds new features, and fixes issues. Download the latest firmware from Nikon’s official website, ensuring compatibility with your camera model. Connect the camera to a computer via USB or use a memory card for updates. Use a fully charged battery and avoid interruptions during the process. Follow on-screen instructions carefully and do not turn off the camera until the update is complete. After updating, restart the camera to apply the changes. Regularly check for firmware updates to keep your D750 up-to-date with the latest enhancements and improvements.

Storing and Transporting the Camera

To maintain the Nikon D750’s condition, store it in a cool, dry place away from direct sunlight and moisture. Use a protective case or pouch to prevent scratches and damage. When transporting, ensure the camera is securely packed in a padded bag or hard case. Remove the battery and memory cards to prevent damage from power surges or static electricity. Avoid extreme temperature changes and keep the lens capped to protect it from dust and scratches. Always handle the camera with care, using a neck or wrist strap for added security during travel. Regularly inspect the camera and accessories before and after transportation;

Digital Resources and Support

The Nikon D750 user manual can be accessed digitally via the Nikon Manual Viewer 2 app. Firmware updates, online tutorials, and customer support are also available online.

Using the Nikon Manual Viewer 2 App

The Nikon Manual Viewer 2 app allows users to download and view Nikon camera manuals, including the D750, on their smartphones or tablets. It supports iOS, iPad, iPod touch, and Android devices. The app provides offline access to detailed instructions, making it ideal for photographers who need quick reference without internet connectivity. Features include browsing by section, searching for specific topics, and bookmarking important pages. This tool is essential for understanding advanced settings, troubleshooting, and maintaining the camera. It ensures users can always access the latest information to optimize their Nikon D750 experience.

Downloading Firmware and Software

Downloading the latest firmware and software for the Nikon D750 is essential for optimal performance. Visit Nikon’s official website and navigate to the support section. Select the D750 model and choose the appropriate firmware version for your camera. Ensure your computer meets the system requirements before proceeding. Follow the on-screen instructions to download and install the firmware. Always use a fully charged battery or connect the camera to a power source during updates. Regular firmware updates enhance camera functionality, improve compatibility with lenses and accessories, and fix potential bugs. This ensures your Nikon D750 operates at its best.

Accessing Online Tutorials and Guides

Accessing online tutorials and guides for the Nikon D750 is straightforward. Nikon’s official website offers a wealth of resources, including instructional videos, firmware updates, and detailed guides. The Nikon Manual Viewer 2 app allows users to download and view manuals offline on their smartphones or tablets. Additionally, third-party websites like YouTube and photography forums provide tutorials and tips from experienced photographers. These resources cover topics from basic camera operation to advanced techniques, ensuring users can continuously improve their skills and make the most of their Nikon D750.

The Nikon D750 user manual is a vital resource for photographers, offering detailed guidance to unlock the camera’s full potential. Continuous learning and exploration will enhance your photography journey.

Maximizing Your Nikon D750 Experience

To maximize your Nikon D750 experience, explore its customizable settings and shooting modes to tailor the camera to your photography style. Experiment with manual mode, aperture priority, and custom profiles for precise control. Regularly update firmware and utilize resources like the Nikon Manual Viewer 2 app for guidance. Understanding ISO, autofocus, and metering modes will enhance image quality. Continuous learning and practice will help you master the D750, ensuring you capture stunning photos and videos with confidence. By leveraging its advanced features, you can unlock the full creative potential of this versatile camera.

Continuous Learning and Improvement

Continuous learning is key to mastering the Nikon D750. Explore online tutorials, forums, and the Nikon Manual Viewer 2 app for in-depth guidance. Regularly update firmware to ensure optimal performance and access new features. Experiment with different shooting modes, autofocus settings, and custom profiles to refine your technique. Engage with photography communities to share tips and learn from others. By staying informed and practicing consistently, you can unlock the D750’s full potential and continually improve your photography skills, ensuring every shot captures your creative vision with precision and excellence.

powersmart lawn mower parts manual

Welcome to the PowerSmart Lawn Mower Parts Manual, your comprehensive guide for understanding, maintaining, and repairing your lawn mower. This manual outlines essential components, safety tips, and detailed instructions to ensure optimal performance and longevity. Refer to the exploded diagrams and parts list for accurate identification and ordering of genuine OEM parts. Proper use of this manual will help you troubleshoot issues, perform routine maintenance, and enhance your mowing experience. Always prioritize safety and use original equipment manufacturer (OEM) parts for reliability and durability.

1.1 Overview of the Manual’s Purpose and Structure

This manual is designed to provide clear instructions for the safe operation, maintenance, and repair of your PowerSmart lawn mower. It is structured to guide users through essential tasks, from initial setup to troubleshooting. The manual includes safety guidelines, exploded diagrams, and a detailed parts list to help identify components. Each section is organized to ensure ease of use, covering topics such as assembly, routine maintenance, and repair procedures. Refer to this guide for optimal performance and longevity of your lawn mower.

1.2 Importance of Using OEM Parts

Using original equipment manufacturer (OEM) parts is crucial for maintaining your PowerSmart lawn mower’s performance and safety. These parts are specifically designed for your model, ensuring precise fitment and reliability. Non-OEM parts may void your warranty and pose safety risks. Always choose genuine components to protect your investment and ensure longevity. Refer to the parts list for correct identification and ordering information.

Safety Guidelines and Precautions

Adhere to safety guidelines to ensure safe operation. Wear protective gear, clear debris, and follow manual instructions. Never leave the mower unattended and keep children away.

2.1 General Safety Tips for Lawn Mower Operation

Always wear protective gear, including gloves, safety glasses, and sturdy footwear. Clear the area of debris before mowing. Avoid loose clothing that could get caught. Keep children and pets at a safe distance. Never operate the mower while under the influence of alcohol or drugs. Ensure the mower is on a stable, level surface. Follow all instructions in the manual, and never leave the mower unattended while it is in operation. Stay alert and cautious during use.

2.2 Safety Messages and Warnings in the Manual

The manual contains essential safety messages and warnings to ensure safe operation and maintenance of your PowerSmart lawn mower. These alerts highlight potential hazards, such as injury risks or equipment damage. Symbols like DANGER, WARNING, CAUTION, and NOTE are used to draw attention to critical information. Always read and follow these guidelines carefully to avoid accidents and ensure proper functioning of the mower. Adhere to all safety precautions for a secure mowing experience.

2.3 Handling Chemicals and Fuels Safely

When handling chemicals or fuels for your PowerSmart lawn mower, always wear protective gear, including gloves and eyewear. Ensure proper ventilation to avoid inhaling fumes. Store fuels and chemicals in approved containers, away from heat sources or open flames. Dispose of waste materials responsibly, following local regulations. Never mix chemicals or overfill fuel tanks. Refer to the manual for specific guidelines on handling and storing these substances safely to prevent accidents and ensure environmental protection.

Unpacking and Inventory of Parts

Carefully unpack the lawn mower and all components, ensuring no damage. Verify each part against the provided list to confirm completeness. Retain all packaging until assembly is complete to prevent loss or damage. This step ensures all necessary components are accounted for before proceeding with assembly or maintenance, using only genuine OEM parts for reliability and performance.

3.1 Steps to Unpack the Lawn Mower

  1. Carefully remove the lawn mower and all accessories from the carton.
  2. Inspect for any visible damage during shipping.
  3. Locate and review the parts list to identify all components.
  4. Retain the packaging until the mower is fully assembled and operational.
  5. Ensure no parts are missing before proceeding with assembly or use.

3.2 Verifying the Parts Against the List

After unpacking, carefully compare each component with the provided parts list in the manual. Ensure all items, including hardware and accessories, are present and undamaged. Cross-reference each part using the exploded diagram for clarity. If any discrepancies are found, contact PowerSmart customer support immediately. Do not discard the original packaging until all parts are verified and accounted for to avoid potential issues during assembly or operation.

3.4 Importance of Retaining Packaging

Retaining the original packaging is crucial for protecting the lawn mower and its components during storage or transportation. The packaging materials, such as boxes and inserts, are specifically designed to prevent damage. Keep all packaging until the mower is fully assembled and verified to be in good working condition. This ensures that any potential returns or repairs can be handled efficiently, maintaining the product’s warranty and overall value. Proper storage also safeguards against accidental damage;

Assembly and Setup Instructions

Follow the exploded diagram to align and assemble parts correctly. Attach handles securely, install the blade, and ensure all components are tightened properly for safe operation. Check alignment.

4.1 Assembling the Lawn Mower

Begin by unpacking and verifying all parts against the list. Use the exploded diagram for reference. Attach the handlebars securely, ensuring all bolts are tightened. Install the blade carefully, following the manual’s alignment guide. Connect any additional components like the grass catcher or mulching kit. Double-check all connections and ensure proper tightening for safety and functionality. Refer to the parts list for specific instructions and torque specifications.

4.2 Adjusting and Securing Parts

After assembly, ensure all components are properly aligned and securely fastened. Tighten bolts and nuts to the torque specifications outlined in the manual. Adjust the handlebars to your preferred height and ensure the blade is level for even cutting. Double-check that all safety features, such as the blade brake, are functioning correctly. Regularly inspect and tighten any loose parts to prevent wear and ensure optimal performance. Always refer to the manual for specific adjustment guidelines.

Operating the PowerSmart Lawn Mower

Learn how to safely start, operate, and stop your lawn mower. This section covers essential techniques for effective mowing, including engine operation and blade control. Follow guidelines for optimal performance and safety.

5.1 Starting and Stopping the Engine

To start the engine, ensure the lawn mower is on a level surface and the brake is engaged. Pull the choke lever to the “start” position, then pull the starter cord firmly. Once the engine starts, move the choke to the “run” position. To stop, switch off the ignition and allow the engine to cool. Always follow safety guidelines and ensure the area is clear before operating. Refer to the manual for specific instructions.

5.2 Mowing Techniques and Best Practices

For optimal results, mow in steady, overlapping passes, maintaining a consistent pace. Avoid cutting more than one-third of the grass blade length in one session. Leave grass clippings on the lawn to act as a natural fertilizer. For taller grass, raise the mowing deck and gradually lower it. Always keep the mower blade sharp to ensure clean cuts and prevent tearing. Regularly clean the mower deck to maintain efficiency and prevent clogging.

Maintenance and Servicing

Regular maintenance ensures your PowerSmart lawn mower performs optimally. Schedule routine tasks like oil changes, blade sharpening, and air filter cleaning. Seasonal preparation, such as winter storage and spring tune-ups, is essential for longevity. Refer to the manual for specific servicing intervals and guidelines to keep your mower in top condition year-round.

6.1 Routine Maintenance Tasks

Perform routine maintenance tasks regularly to ensure your PowerSmart lawn mower operates efficiently. Check and change the engine oil, sharpen or replace the cutting blade, and clean or replace the air filter. Inspect the mower deck for debris and ensure all bolts and nuts are tightened. Lubricate moving parts and check tire pressure. Regular maintenance prevents premature wear and extends the life of your lawn mower. Always refer to the manual for specific instructions and recommendations.

6.2 Seasonal Maintenance and Preparation

Prepare your PowerSmart lawn mower for seasonal changes to maintain performance. Before storing, drain the fuel tank, clean the mower deck, and apply rust-inhibiting oil. Store in a dry, protected area. In spring, inspect all parts, sharpen the blade, and ensure proper tire pressure. Regular seasonal maintenance ensures your mower remains in optimal condition and ready for the next mowing season. Always follow the manual’s guidelines for specific preparation steps.

6.3 Storage Tips for Off-Season

Properly store your PowerSmart lawn mower during the off-season to maintain its condition. Clean the mower deck and blade thoroughly, removing dirt and debris. Empty the fuel tank or stabilize the fuel with a conditioner. Apply rust-inhibiting oil to metal parts and store in a dry, protected area. Cover the mower to protect from dust and moisture. Ensure all parts are secure and check for any damage before storage to prevent issues when restarting in the spring.

Troubleshooting Common Issues

Identify and resolve common problems like engine issues or uneven cutting. Use the manual’s diagnostic guides to find solutions and maintain your mower’s performance effectively.

7.1 Identifying and Diagnosing Problems

Start by reviewing the manual’s troubleshooting section to identify common issues like engine malfunction or uneven cutting. Use the exploded diagrams to locate parts and refer to diagnostic guides for step-by-step checks. Always follow safety guidelines before attempting repairs. Check for worn or damaged components and compare against the parts list to ensure accurate identification. This systematic approach helps pinpoint problems quickly and effectively, preventing further damage and ensuring proper functionality.

7.2 Solutions for Common Lawn Mower Issues

Address common issues like a faulty starter or clogged deck by referring to the manual’s troubleshooting guide. Replace worn blades or belts using genuine OEM parts for optimal performance. If the engine stalls, check fuel levels and air filters. For uneven cutting, adjust the blade height or sharpen dull blades. Always use the exploded diagram to locate and replace parts accurately. Regular maintenance and timely repairs ensure your lawn mower runs smoothly and efficiently.

Exploded View and Parts List

This section provides a detailed visual breakdown of the lawn mower’s components through an exploded diagram, along with a comprehensive list of part numbers and descriptions for easy identification and ordering of genuine OEM parts.

8.1 Understanding the Exploded Diagram

The exploded diagram visually represents your lawn mower’s assembly, displaying each part in relation to others. Use this diagram to identify components, understand their placement, and locate specific parts quickly. Refer to the corresponding parts list for exact numbers and descriptions. This tool aids in diagnosing issues, ordering replacements, and ensuring accurate repairs. Always cross-check with the parts list to confirm compatibility and part numbers before making any purchases or adjustments to your mower.

8.2 Locating Parts Using the Diagram

Use the exploded diagram to identify and locate specific parts on your lawn mower. Each component is labeled with a reference number, corresponding to the parts list. Start by finding the general area of the part you need, then match its number to the list for details. This method ensures accurate identification and simplifies the process of ordering replacement parts. Always cross-reference with the parts list to confirm compatibility and part numbers.

Repair and Replacement Guidance

Identify worn or damaged parts using the exploded diagram. Use the correct tools and materials to replace components, ensuring reliability and safety. Always refer to the parts list for accurate identification and ordering of genuine OEM parts to maintain optimal performance and warranty validity.

9.1 Steps for Replacing Worn or Damaged Parts

Start by disconnecting power and ensuring the mower is safe to work on. Refer to the exploded diagram to locate the damaged part. Remove the old component using appropriate tools, then install the new part securely. Tighten all fasteners properly and reassemble any components. Test the mower to ensure proper function. Always follow safety guidelines and use genuine OEM parts for reliable performance and longevity. If unsure, consult the manual or contact customer support for assistance.

9.2 Tools and Materials Needed for Repairs

For repairs, essential tools include wrenches, screwdrivers, pliers, and a torque wrench. Materials like grease, oil, and replacement filters may be required. Always use genuine OEM parts to ensure compatibility and reliability. Refer to the exploded diagram for specific part locations and torque specifications. Keep a clean workspace and follow safety guidelines to avoid accidents; Proper tools and materials ensure efficient and effective repairs, maintaining your lawn mower’s performance and longevity.

Environmental Considerations

This section covers eco-friendly mowing practices, proper disposal of old parts, and sustainable maintenance tips. Using OEM parts and efficient techniques minimizes environmental impact and promotes sustainability.

10.1 Proper Disposal of Old Parts

Always dispose of old lawn mower parts responsibly to minimize environmental impact. Separate metal, plastic, and hazardous materials like batteries or fluids. Check local regulations for designated recycling centers or hazardous waste facilities. Never dispose of parts in regular trash or landfill. Draining fluids and cleaning parts before disposal is essential. Recycle materials whenever possible and avoid releasing harmful substances into the environment. Proper disposal ensures sustainability and eco-friendly practices.

10.2 Eco-Friendly Mowing Practices

Adopt eco-friendly mowing practices to reduce environmental impact. Adjust mowing height to 2.5-3 inches to promote healthy grass growth, reducing waste. Use mulching features to leave clippings on the lawn, acting as a natural fertilizer. Opt for cordless or electric mowers to minimize emissions. Regularly maintain your mower to ensure fuel efficiency and lower emissions. Follow seasonal mowing schedules and sharpen blades to avoid tearing grass, preserving its health and reducing waste.

Warranty and Customer Support

Your PowerSmart lawn mower is backed by a comprehensive warranty. Register your product and review the terms for coverage details. For inquiries or issues, contact PowerSmart customer support for assistance with troubleshooting, repairs, or parts. The support team is available to ensure your experience with the lawn mower is satisfactory and hassle-free.

11.1 Understanding the Warranty Coverage

The PowerSmart warranty provides coverage for defects in materials and workmanship for a specified period. It typically includes repair or replacement of faulty parts, excluding wear and tear. Review the manual for terms, as some components may have shorter coverage periods. Registration is often required to activate the warranty. Ensure to keep proof of purchase and adhere to maintenance guidelines to maintain coverage eligibility and enjoy uninterrupted support for your lawn mower.

11.2 Contacting PowerSmart Customer Service

For assistance with your PowerSmart lawn mower, contact customer service via phone, email, or through the official website. Visit the support portal for detailed contact information and operating hours. Have your model number and manual ready for efficient assistance. The team is available to address warranty inquiries, technical support, and parts orders. Ensure to reach out during business hours for prompt resolution of any concerns or questions regarding your lawn mower.

Accessories and Additional Parts

Enhance your lawn mower’s performance with genuine PowerSmart accessories. Refer to the manual for recommended parts and ordering information to maintain optimal functionality and longevity.

12.1 Recommended Accessories for Enhanced Performance

Upgrade your PowerSmart lawn mower with authentic accessories like high-capacity batteries, mulching kits, and reinforced blades. These additions improve efficiency, cutting quality, and versatility. Use the parts diagram to identify compatible upgrades, ensuring a perfect fit. Genuine accessories maintain warranty coverage and optimize performance, extending the life of your mower. Always refer to the manual for installation guidance and part numbers to enhance your mowing experience effectively.

12.2 Ordering Genuine PowerSmart Parts

To ensure optimal performance and maintain your warranty, order genuine PowerSmart parts directly from authorized dealers or the official website. Use the parts diagram and manual to identify correct part numbers. Visit the PowerSmart website, enter the part number, and follow the checkout process. For assistance, contact PowerSmart customer service. Genuine parts guarantee proper fit, reliability, and compliance with safety standards, ensuring your lawn mower operates at its best.

Diagrams and Visual Guides

This section provides detailed diagrams and visual guides to help you understand and identify parts for your PowerSmart lawn mower. Use these resources to ensure proper assembly, maintenance, and repairs by referencing the exploded views and instructions provided.

13.1 Using the Parts Diagram for Reference

The parts diagram provides a detailed visual representation of your PowerSmart lawn mower, making it easier to locate and identify components. Use this diagram to cross-reference part numbers, ensuring accurate identification for repairs or replacements. It serves as a valuable tool for understanding how parts interact and fit together. Refer to the diagram alongside the manual to enhance your troubleshooting and maintenance efforts, ensuring all repairs align with manufacturer specifications.

13.2 Visual Instructions for Assembly and Repair

The manual includes detailed visual guides to assist with assembly and repair. These step-by-step instructions use images and labels to clearly illustrate each process. Refer to the diagrams for a better understanding of complex tasks, such as installing or replacing parts. Visual guides reduce errors by providing a clear, actionable reference, ensuring that all components are correctly assembled or repaired according to PowerSmart specifications.

comelit intercom manual

Welcome to the Comelit Intercom manual‚ your guide to understanding and utilizing cutting-edge communication systems. Comelit‚ a leader in intercom solutions‚ offers innovative audio and video systems designed for residential and commercial settings. This manual provides essential insights for installation‚ configuration‚ and operation.

What is Comelit Intercom?

Comelit Intercom is a cutting-edge communication system designed for seamless audio and video connectivity. It offers a range of solutions tailored for residential and commercial environments‚ ensuring high-quality interaction between users. Comelit systems integrate advanced features like privacy mode‚ SMS command functionality‚ and compatibility with home automation systems. Known for their reliability and user-friendly design‚ these intercoms are widely used globally‚ with a strong presence in regions like Singapore‚ where they are installed in numerous private condominiums. Comelit intercoms support both wired and wireless configurations‚ catering to diverse installation needs. Their systems are also compatible with security and access control technologies‚ enhancing overall property safety. Whether for apartment complexes or office buildings‚ Comelit Intercom delivers efficient communication solutions‚ ensuring clarity and security in every interaction. This manual will guide you through the installation‚ configuration‚ and operation of these systems‚ helping you maximize their potential for a secure and connected environment.

Importance of the Manual

This manual is an essential resource for understanding and optimizing the use of your Comelit Intercom system. It provides detailed guidance on installation‚ configuration‚ and troubleshooting‚ ensuring a smooth setup process. The manual also covers advanced features such as privacy mode‚ SMS command setup‚ and integration with security systems‚ helping you maximize the system’s functionality. Whether you’re a homeowner or a building manager‚ this guide offers step-by-step instructions to address common issues and maintain optimal performance. By following the manual‚ you can ensure your intercom system operates securely and efficiently‚ providing reliable communication and enhancing property safety. This comprehensive guide is tailored to meet the needs of both technical and non-technical users‚ making it an invaluable tool for anyone working with Comelit Intercom systems.

Brief History of Comelit

Comelit‚ an Italian company founded in 1956‚ has established itself as a global leader in designing and manufacturing intercom systems‚ access control‚ and home automation solutions. With over six decades of experience‚ Comelit has evolved from a small Italian firm to a renowned international brand‚ trusted for its innovative and reliable communication systems. The company has expanded its presence worldwide‚ with significant installations in countries like Singapore‚ where its systems are deployed in over 100 private condominiums‚ and the United States‚ where it collaborates with leading technology providers. Comelit’s commitment to innovation and quality has led to the development of cutting-edge products‚ including video entry systems‚ IP intercoms‚ and integrated security solutions. Its partnership with companies like Latch further underscores its influence in the smart building and access control markets. Comelit’s history reflects a dedication to advancing communication and security technologies‚ making it a preferred choice for residential and commercial properties globally.

Installation Guide

Welcome to the Comelit Intercom installation guide. This section provides step-by-step instructions‚ system requirements‚ and wiring diagrams to ensure a smooth setup. Follow the manual carefully to configure your intercom system efficiently and effectively.

System Requirements

To ensure optimal performance of your Comelit Intercom system‚ certain requirements must be met. The system is compatible with 2-wire video entry systems and supports connection to remote color cameras. A stable power supply of 12V DC is necessary for proper functioning. For network integration‚ an Ethernet connection or Wi-Fi compatibility is required‚ depending on the model. Ensure your network supports the specified bandwidth for video and audio transmission. Additionally‚ compatibility with Comelit Building kits and integration with access control systems is essential. The system works seamlessly with Comelit’s ViP platform and compatible software. Always refer to the wiring diagrams provided in the manual for correct installation. Ensure all devices are updated to the latest firmware for enhanced security and functionality. For detailed specifications‚ consult the product manual or contact Comelit support. Proper system configuration ensures reliable operation and maximizes the benefits of your intercom system.

Wiring Diagrams

Wiring diagrams are essential for the proper installation and configuration of your Comelit Intercom system. These diagrams provide a visual representation of the connections required between components‚ ensuring a seamless setup process. The manual includes detailed wiring diagrams specific to 2-wire video entry systems‚ compatible with Comelit Building kits. For instance‚ the 1621VC audio module requires precise wiring to connect to a remote color PAL camera‚ as outlined in the diagrams. Additionally‚ the manual offers product comparison tables to help you identify the correct wiring configuration for your specific system. Always refer to these diagrams to avoid errors during installation. The wiring diagrams are complemented by full instructions‚ ensuring clarity and accuracy. By following the provided wiring guides‚ you can ensure reliable communication and video transmission. Proper wiring is crucial for maximizing system performance and preventing potential issues. Consult the wiring diagrams in the manual for a successful installation.

Step-by-Step Installation

Installing your Comelit Intercom system requires careful planning and execution. Begin by planning the layout‚ ensuring all units are strategically placed for optimal performance. Next‚ mount the intercom units securely‚ following the manufacturer’s guidelines. After mounting‚ proceed with wiring‚ adhering strictly to the provided wiring diagrams to avoid errors. This step is crucial for maintaining reliable communication and preventing future issues.

Once the wiring is complete‚ configure the network settings to integrate the intercom with other devices or security systems. This may involve setting IP addresses or connecting to existing networks. Finally‚ test the system thoroughly to ensure all features are functioning correctly‚ including audio‚ video‚ and any integrated security features. If issues arise during installation‚ refer to the troubleshooting section or consult the manual for guidance. Proper installation ensures a seamless and efficient communication experience with your Comelit Intercom system.

System Configuration

Configuring your Comelit Intercom system involves setting up audio-video preferences‚ network settings‚ and integrating with security systems. Use the manual to guide you through optimizing performance and ensuring compatibility with your existing infrastructure.

  • Adjust audio and video settings for clarity.
  • Set up network parameters for seamless connectivity.
  • Integrate with security systems for enhanced functionality.

Audio and Video Setup

Properly configuring the audio and video settings is essential for optimal performance of your Comelit Intercom system. Start by connecting the audio module to the main unit‚ ensuring all wires are securely fastened. For video setup‚ connect the camera to the monitor using the provided RCA or HDMI cables‚ depending on your system type. Refer to the wiring diagrams in the manual for precise connections.

Once connected‚ access the system menu via the monitor or remote control. Navigate to the audio/video settings and adjust the volume‚ brightness‚ and contrast to your preference. Ensure the camera is positioned correctly to capture clear video footage. Test the intercom by making a call between internal units to verify audio clarity and video synchronization.

If using a 2-wire system‚ ensure proper synchronization between audio and video signals to avoid delays. For advanced configurations‚ consult the manual for SMS command setup to enable remote monitoring. Regularly check camera angles and lighting conditions to maintain high-quality video feed. By following these steps‚ you can enjoy seamless communication and surveillance through your Comelit Intercom system.

Network Configuration

Configuring the network settings for your Comelit Intercom system ensures seamless communication and integration with other devices. Begin by connecting the intercom to your local network using an Ethernet cable or Wi-Fi‚ depending on the model. Assign a static IP address to the intercom device to maintain consistent connectivity. Refer to your router’s settings to enable port forwarding‚ which allows remote access to the intercom system.

For advanced setups‚ configure the intercom to work with your existing security or smart home systems. Enable encryption protocols to secure data transmission and protect against unauthorized access. Test the network connection by pinging the intercom’s IP address or using the Comelit software to verify communication. Troubleshoot any issues by checking physical connections‚ restarting devices‚ or consulting the manual for specific guidelines.

Regularly update network settings to adapt to changes in your local network environment. Ensure all devices are on the same subnet and that firewalls are configured to allow necessary ports. By properly configuring your network‚ you can enjoy reliable performance and enhanced functionality from your Comelit Intercom system. Always refer to the manual for model-specific instructions.

Integration with Security Systems

Comelit Intercom systems are designed to integrate seamlessly with various security systems‚ enhancing overall property protection. By connecting your intercom to access control systems‚ you can manage entry points efficiently. For example‚ integrate with smart locks or biometric scanners to grant access only to authorized individuals. Additionally‚ Comelit systems can be linked to surveillance cameras‚ allowing live video monitoring directly through the intercom interface.

The intercom also works with alarm systems‚ enabling real-time alerts during suspicious activities. Use SMS command setups to receive notifications or trigger responses remotely. Many users pair Comelit intercoms with systems like Latch‚ creating a unified security solution. Ensure compatibility by checking the manual for specific integration protocols and software requirements.

Configuration typically involves connecting systems via API or IP integration. This setup allows central control‚ linking video feeds‚ access logs‚ and alarm triggers. Always consult the manual for detailed steps tailored to your system. Proper integration enhances security and streamlines monitoring‚ ensuring a safer environment.

Operation and Functionality

Comelit Intercom offers advanced features for seamless communication. Make internal calls‚ activate privacy mode to silence ring tones‚ and send SMS commands for remote control. The system also supports video monitoring‚ ensuring comprehensive functionality for user convenience and security.

Making Internal Calls

Making internal calls with your Comelit Intercom system is straightforward and efficient. To initiate a call‚ simply select the desired internal unit from the apartment monitor or remote app interface. The system supports both audio and video calls‚ ensuring clear communication. For added convenience‚ users can also dial directly using the keypad‚ entering the specific extension or apartment number.

Once a call is placed‚ the recipient’s monitor will ring and display a video preview if enabled. The caller can choose to mute their microphone or switch to privacy mode to silence notifications. Internal calls can also be made between multiple units simultaneously‚ making it ideal for announcements or group communication.

The Comelit Intercom system ensures a seamless and secure internal calling experience‚ with features like call waiting and do-not-disturb options. For further customization‚ users can program speed-dial buttons or set up call forwarding to external numbers. This functionality enhances connectivity within residential or commercial settings‚ making it a reliable solution for daily communication needs.

Refer to the manual for detailed instructions on advanced features like SMS command integration‚ which allows users to control call settings remotely. With Comelit‚ internal communication is both intuitive and powerful‚ designed to meet the demands of modern living and working environments.

Privacy Mode

Privacy Mode on your Comelit Intercom system allows users to silence incoming call notifications‚ ensuring uninterrupted peace in their living or working spaces. This feature is particularly useful in residential settings where privacy is paramount. When enabled‚ the system mutes the ringtone and visual alerts‚ preventing disturbances during meetings‚ rest periods‚ or family time.

Activating Privacy Mode is simple: access the settings menu on your apartment monitor or via the remote app‚ then toggle the Privacy Mode option. Users can also schedule Privacy Mode to activate automatically during specific hours‚ such as overnight or during business meetings.

While Privacy Mode silences notifications‚ it does not disconnect the system. Users can still receive calls and messages; however‚ they will not be alerted audibly or visually. This ensures that important communications are not missed while maintaining a quiet environment.

The Comelit Intercom system balances convenience and privacy seamlessly‚ offering customizable settings to suit individual preferences. For more detailed instructions on configuring Privacy Mode‚ refer to the user manual or contact customer support.

SMS Command Setup

The SMS Command Setup feature on your Comelit Intercom system allows users to send text messages to control specific functions remotely. This feature is particularly useful for managing access‚ monitoring‚ and system adjustments without physical interaction.

By sending predefined SMS commands to your Comelit 4G GSM Intercom‚ you can perform actions such as unlocking doors‚ checking system status‚ or enabling privacy mode. For example‚ typing “OPEN” or “UNLOCK” can grant access to visitors‚ while “STATUS” provides real-time updates on the system’s operation.

These commands are easy to configure and can be customized to meet individual needs. The system supports multiple users‚ allowing property managers or homeowners to delegate access securely.

For a full list of supported SMS commands and setup instructions‚ refer to the user manual or contact Comelit support. This feature enhances convenience and remote monitoring‚ making it a powerful tool for modern intercom systems.

Maintenance and Troubleshooting

Regular maintenance ensures optimal performance. Check for firmware updates‚ clean equipment‚ and verify all connections. For any issues‚ consult the troubleshooting guide or contact Comelit support for professional assistance.

Regular Maintenance

Regular maintenance is essential to ensure the optimal performance and longevity of your Comelit Intercom system. Start by inspecting the wiring and connections to prevent issues caused by wear and tear. Clean the camera lenses and monitors regularly to maintain video clarity. Check for software updates and install them promptly to benefit from the latest features and security patches. Additionally‚ test the intercom’s audio and video functionality periodically to identify and address any potential problems early. For detailed instructions‚ refer to the specific maintenance guidelines provided in this manual. Regular upkeep not only enhances system reliability but also ensures uninterrupted communication and security in your property.

Common Issues

While Comelit intercom systems are reliable‚ users may encounter occasional issues. One common problem is connectivity loss‚ often due to faulty wiring or poor network configuration. Another issue is audio or video quality degradation‚ which can result from interference or outdated software. Privacy mode may fail to activate‚ allowing unwanted calls‚ and SMS commands might not function properly if the system is not configured correctly. Additionally‚ some users report difficulty integrating the intercom with security systems‚ leading to monitoring gaps. Regular software updates and proper installation can prevent many of these problems. Always refer to the manual for troubleshooting steps or contact support for assistance. Ensuring your system is up-to-date and correctly configured is key to maintaining optimal functionality and security.

Software Updates

Regular software updates are essential to ensure your Comelit intercom system operates at peak performance. Updates often include bug fixes‚ security enhancements‚ and new features to improve functionality. To update your system‚ access the settings menu via the user interface and select the “Software Update” option. The system will automatically check for available updates and guide you through the installation process. Always ensure your device is connected to a stable internet connection during updates to avoid interruptions. For advanced systems‚ updates may also be performed remotely by authorized personnel. Keeping your software up-to-date is crucial for maintaining compatibility with integrated security systems and ensuring optimal performance. Refer to your Comelit intercom manual for detailed step-by-step instructions tailored to your specific model. Regular updates help safeguard your system against potential vulnerabilities and ensure you benefit from the latest innovations in intercom technology.

Security Features

Comelit intercom systems offer robust security features‚ including advanced access control‚ data encryption‚ and real-time monitoring. These features ensure secure communication and protect against unauthorized access‚ providing peace of mind for users in residential and commercial settings.

Access Control

Comelit Intercom systems offer advanced access control features‚ ensuring secure entry management for residential and commercial settings. These systems integrate seamlessly with electronic locks‚ keycard readers‚ and biometric scanners‚ providing robust security solutions. With Comelit‚ you can grant or restrict access to specific areas‚ monitor entry points‚ and maintain a record of all access events.

  • Keycard and biometric integration for enhanced security.
  • Customizable access permissions for different users.
  • Real-time monitoring of entry points.
  • Compatibility with existing security infrastructure.

Comelit’s access control solutions are designed to streamline security management while ensuring maximum protection. Whether it’s for a single building or a multi-unit complex‚ Comelit systems provide reliable and efficient access control‚ enhancing overall security and user convenience.

Data Encryption

Data encryption is a critical security feature in Comelit Intercom systems‚ ensuring that all communications remain secure and protected from unauthorized access. Comelit employs advanced encryption protocols‚ such as AES (Advanced Encryption Standard)‚ to safeguard audio‚ video‚ and data transmissions. This ensures that sensitive information‚ like access codes or video feeds‚ cannot be intercepted or exploited by malicious actors.

  • AES encryption for secure data transmission.
  • Protection of audio and video communications.
  • Encrypted access codes and user credentials.
  • Secure communication channels for all system operations.

Comelit’s encryption capabilities are designed to provide peace of mind for users‚ knowing their interactions and data are shielded from potential breaches. By integrating robust encryption into their intercom systems‚ Comelit ensures a high level of security‚ making their solutions trusted for both residential and commercial applications.

Monitoring

Monitoring is a vital feature of Comelit Intercom systems‚ enabling users to maintain constant vigilance over their premises. The system allows for real-time surveillance through live video feeds‚ ensuring that users can monitor activities at their doorstep or within their property. This feature is particularly useful for enhancing security and providing peace of mind.

  • Real-time video monitoring for added security.
  • Live feeds from cameras connected to the intercom system.
  • Remote monitoring capabilities via compatible devices.
  • Customizable alerts for motion detection or unauthorized access.

Comelit’s monitoring capabilities integrate seamlessly with other security features‚ such as access control and data encryption‚ to create a comprehensive security solution. Users can easily keep track of who enters their property and respond accordingly‚ making it an essential tool for both residential and commercial settings.

aroma 6 cup rice cooker instruction manual

Welcome to the Aroma 6-Cup Rice Cooker, designed for easy and efficient rice preparation. This compact cooker is perfect for everyday meals, offering simple operation and consistent results. Included are a measuring cup, spatula, and multi-language instruction manual for convenience. With its durable design and 1-year limited warranty, it’s a great addition to any kitchen.

1.1 Congratulations on Your Purchase

Congratulations on purchasing the Aroma 6-Cup Rice Cooker! This versatile appliance is designed to make cooking rice and other dishes easy and efficient. With its compact size and user-friendly design, it’s perfect for everyday meals. Included with your purchase are a measuring cup, spatula, and a comprehensive instruction manual to guide you through its features and operation. By following the instructions, you’ll be able to prepare delicious, fluffy rice and explore other culinary possibilities. Welcome to a world of convenient and flavorful cooking with your new Aroma Rice Cooker!

1.2 Important Safety Precautions

Congratulations on your new Aroma 6-Cup Rice Cooker! For safe and optimal use, read these precautions carefully. Keep the cooker out of children’s reach and avoid touching hot surfaces during operation. Never submerge the cooker in water or use abrasive cleaners, as this may damage the unit. Ensure the power cord is placed away from heat sources to prevent overheating. Always unplug the cooker when not in use or before cleaning. Follow the instructions closely to avoid accidents and maintain the cooker’s performance. Proper care will ensure years of reliable service and delicious meals;

Understanding the Components

The Aroma 6-Cup Rice Cooker features a cooking pot, lid, and control panel. These components work together to ensure efficient and even rice cooking every time.

2.1 Parts of the Rice Cooker

The Aroma 6-Cup Rice Cooker includes a cooking pot, lid, steam vent, and control panel. The cooking pot is non-stick for easy rice removal, while the lid ensures even steam distribution. The steam vent allows moisture to escape, preventing overflow. The control panel features simple buttons for operation. Additional components include a measuring cup for precise water and rice ratios, a spatula for serving, and a steam tray for optional steaming. These parts work together to deliver perfectly cooked rice and versatile cooking options.

2.2 Accessories Included

Your Aroma 6-Cup Rice Cooker comes with essential accessories to enhance your cooking experience. A measuring cup is provided to ensure accurate water and rice ratios. A sturdy spatula is included for effortless serving and scraping the sides of the pot. The instruction manual offers detailed guidance for operation, troubleshooting, and exploring advanced features. These accessories are designed to make cooking convenient and efficient, helping you achieve perfect results every time. They also support the cooker’s versatility, allowing you to prepare a variety of dishes beyond rice.

Measuring Rice and Water

Accurate measurement is key to perfect rice. Use the provided measuring cup for both rice and water. Ensure the rice is leveled for precise ratios and consistent results.

3.1 Using the Measuring Cup

The provided measuring cup is specifically designed for precise measurements. It holds 3/4 of a standard U.S. cup, ensuring accurate ratios for rice and water. Always level the rice with a straight edge or the back of a knife to avoid overfilling. This step is crucial for consistent cooking results, as excess rice or water can lead to improper texture. For best results, rinse rice before measuring to remove excess starch. Accurate measurements guarantee the rice cooks evenly and absorbs the right amount of water, leading to perfectly cooked grains every time.

3.2 Water Level Guidelines

For optimal cooking, align the water level with the corresponding marks inside the cooker. For white rice, fill water to the line marked for 3 cups when using 2 cups of uncooked rice. Brown rice requires more water; fill to the 5-cup line for 2 cups of uncooked brown rice. Always use the provided measuring cup for accurate ratios. Ensure the rice is evenly spread and the cooker is placed on a flat surface. Avoid overfilling, as this may cause overflow during cooking. Proper water levels ensure rice cooks evenly and prevents undercooked or mushy texture. Adjustments may vary based on rice variety and personal preference.

Cooking White Rice

Cooking white rice is straightforward with the Aroma 6-Cup Rice Cooker. Simply add rice and water, plug in the cooker, and select the white rice setting. It cooks to fluffy perfection in about 20-25 minutes, ensuring a delicious meal every time.

4.1 Basic Cooking Instructions

Rinse the rice thoroughly and pour it into the cooking bowl. Use the provided measuring cup to ensure accurate portions. Add water according to the recommended water level for white rice, typically 1 cup of water for every 1 cup of rice. Place the cooking bowl into the rice cooker, plug it in, and close the lid. Select the “White Rice” setting on the control panel; The cooker will automatically start and cook the rice to perfection. Once cooked, the rice cooker will switch to the “Keep Warm” function. Allow it to rest for a few minutes before serving. This ensures fluffy, perfectly cooked rice every time.

4.2 Rice-to-Water Ratio

For optimal results, use a 1:1.25 ratio of rice to water when cooking white rice in the Aroma 6-Cup Rice Cooker. Use the provided measuring cup, which is equivalent to 3/4 of a standard US cup. For example, 2 cups of rice require 2.5 cups of water. Fill the cooking bowl with rinsed rice, add water to the corresponding level, and ensure the water does not exceed the max line. The cooker will automatically adjust cooking time based on the rice and water ratio. This ensures perfectly cooked, fluffy rice every time without overflow or undercooking.

Cooking Brown Rice

Cooking brown rice requires a slightly higher water ratio and longer time than white rice. Use 1.5 cups of water per 1 cup of brown rice. Allows for perfect texture and even cooking.

5.1 Adjusting for Brown Rice

To cook brown rice, increase the water ratio to 1.25 cups of water per 1 cup of rice. This ensures proper hydration and even cooking. Brown rice typically takes 45-50 minutes to cook. Use the provided measuring cup for accurate measurements. Stir gently before starting. The Aroma 6-Cup Rice Cooker automatically adjusts cooking time for brown rice, ensuring a perfect texture every time. Always rinse rice before cooking to remove excess starch for better results. Proper adjustment ensures the rice is tender and not mushy. Follow these steps for ideal brown rice preparation.

5.2 Extended Cooking Time

Brown rice requires a longer cooking time due to its harder outer layer and higher fiber content. The Aroma 6-Cup Rice Cooker automatically extends the cooking cycle to ensure brown rice is thoroughly cooked. This extended time helps break down the natural oils and achieves a softer texture. The cooker’s sensors monitor the rice and adjust heat for even cooking. Typically, brown rice takes 45-50 minutes to cook. This extended process ensures the rice is not undercooked or mushy. The cooker’s automatic function makes it easy to achieve perfect results without constant monitoring. Let the cooker do the work for a delicious, healthy meal.

Using the Delay Timer

The delay timer allows you to set a specific cooking start time, ensuring your rice is ready when you need it. Perfect for busy schedules, it offers flexibility and convenience, letting you prepare meals in advance. Simply set the timer, and the cooker will automatically begin cooking at the designated time, delivering perfectly cooked rice every time.

6.1 Setting the Timer

To set the delay timer on your Aroma 6-Cup Rice Cooker, ensure the unit is plugged in and the display is active. Press the Timer button to activate delay cooking mode. Use the Hour and Minute buttons to set the desired cooking start time. The timer can be adjusted in 1-minute increments. Once set, press the Start/Stop button to confirm. The cooker will automatically begin cooking at the specified time. Ensure the rice and water are already in the cooking pot before setting the timer for perfect results. This feature allows you to plan your meal preparation effortlessly.

6.2 Planning Your Meal

Planning your meal with the Aroma 6-Cup Rice Cooker is simple and convenient. Use the delay timer to schedule cooking up to 24 hours in advance, ensuring your rice is ready when you need it. Estimate portions based on servings, with 1 cup of uncooked rice yielding about 2 cups cooked. Add rice and water in the morning, and come home to perfectly cooked rice. For added convenience, prepare ingredients like vegetables or seasonings in advance and add them to the cooker before setting the timer. This feature allows you to enjoy a freshly cooked meal without last-minute preparation.

Steaming Function

The Aroma 6-Cup Rice Cooker features a convenient steaming function, allowing you to prepare healthy meals while cooking rice. Place the steam tray with vegetables or other foods on top of the rice bowl. Add water to the cooker, ensuring proper steam generation. Use the delay timer to schedule steaming in advance. The cooker’s design enables simultaneous rice cooking and steaming, making meal prep efficient and versatile. Perfect for vegetables, seafood, and more, this function enhances your cooking experience with minimal effort and cleanup.

7.1 Preparing the Steam Tray

Preparing the steam tray is essential for effective steaming. Start by placing a steam cup (1, 2, or 3) on the tray. Add your chosen food, such as vegetables, to the steam cup. Ensure the rice bowl is filled with water according to the guidelines. Position the rice bowl on top of the steam cup. This setup allows steam to circulate evenly, cooking your rice and steaming your food simultaneously. Always ensure the tray is securely placed to prevent any spills or instability during cooking. Proper preparation ensures both rice and steamed food are cooked to perfection.

7.2 Steaming Vegetables

Steaming vegetables with your Aroma 6-Cup Rice Cooker is simple and healthy. Place the steam tray with a steam cup (1, 2, or 3) inside. Add vegetables like broccoli, carrots, or green beans to the steam cup. Ensure the rice bowl has enough water for both cooking rice and generating steam. Once the rice cooker starts, steam will circulate, cooking the vegetables evenly. Cooking time varies depending on vegetable type; delicate vegetables may need 5-10 minutes, while harder ones like carrots may require longer. Check periodically to avoid overcooking. This feature allows you to prepare a complete meal simultaneously, enhancing flavor and nutrition.

Cleaning and Maintenance

Regular cleaning ensures optimal performance. Wipe the exterior with a damp cloth and clean the inner pot and accessories with mild soap. Avoid abrasive cleaners and descale regularly to prevent mineral buildup.

8.1 Cleaning the Rice Cooker

Regular cleaning is essential for maintaining your Aroma 6-Cup Rice Cooker’s performance and longevity. After each use, unplug the cooker and let it cool. Wipe the exterior with a damp cloth to remove splatters. For the inner pot, lid, and accessories, use mild soap and a soft sponge. Rinse thoroughly and dry with a clean towel to prevent moisture buildup. Avoid using abrasive cleaners or scouring pads, as they may damage the surfaces. Cleaning the rice cooker regularly ensures optimal cooking results and prevents residue from affecting future meals.

8.2 Descaling the Unit

Regular descaling is crucial to maintain your Aroma 6-Cup Rice Cooker’s efficiency. Over time, mineral deposits from water can build up inside the unit, affecting performance. To descale, mix equal parts water and white vinegar in the inner pot. Let the solution sit for 30 minutes to an hour to loosen mineral buildup. After soaking, rinse the pot thoroughly with clean water. For tougher deposits, you can use a commercial descaling solution, following the product’s instructions. Ensure all parts are rinsed well to remove any residue. Descaling every 1-2 months, depending on usage, will keep your cooker functioning optimally.

Troubleshooting Common Issues

Ensure the cooker is properly plugged in and the power button is pressed. Check for blockages in steam vents and ensure the lid is sealed tightly during cooking.

9.1 Rice Not Cooking Properly

If your rice isn’t cooking properly, ensure the rice-to-water ratio is correct. Use the provided measuring cup for accuracy; Check that the cooker is properly plugged in and the power button is pressed. Verify the lid is securely closed during cooking. Old or dry rice may require more water. Avoid overcrowding the cooking bowl. If issues persist, clean the steam vent to ensure proper pressure. Allow the cooker to cool before restarting. Consult the manual for additional guidance or contact Aroma support if problems continue.

9.2 Cooker Not Turning On

If the rice cooker isn’t turning on, first ensure it’s properly plugged into a functioning outlet. Verify the outlet by testing it with another appliance. Check the power cord for any visible damage or frays; a damaged cord may prevent the cooker from turning on. Ensure the lid is securely closed, as some models require it to be fully shut to operate. If the issue persists, inspect the circuit breaker or fuse box for any tripped breakers or blown fuses. Resetting the breaker or replacing a blown fuse might resolve the problem. If none of these steps work, contact Aroma customer support for further assistance or warranty service.

Additional Tips for Perfect Rice

For best results, rinse rice before cooking to remove excess starch. Use the included measuring cup for accurate proportions. Experiment with herbs and spices to enhance flavor.

10.1 Rice Variety Guide

Explore various rice types to enhance your cooking experience. White rice is the most common, yielding fluffy grains. Brown rice offers a nuttier flavor and more fiber, requiring a slightly higher water ratio. Jasmine rice is aromatic and sticky, perfect for Asian dishes. Basmati rice is long-grain and fragrant, ideal for biryanis and curries. Experiment with different varieties to find your favorite. Adjust water levels and cooking times based on the type of rice for optimal results. Rinsing rice before cooking can improve texture and reduce starchiness. This guide helps you achieve perfect rice every time, regardless of the variety you choose.

10.2 Enhancing Flavor

Elevate your rice dishes by incorporating aromatic ingredients and seasonings. Sauté onions, garlic, or shallots in the cooker before adding rice for added depth. Herbs like bay leaves, thyme, or rosemary can infuse unique flavors. Spices such as cumin, turmeric, or paprika add vibrant notes. For a savory twist, substitute water with chicken or vegetable broth. A splash of soy sauce or sesame oil can enhance umami. Experiment with saffron or coconut milk for exotic flair. Finish with a drizzle of olive oil or a sprinkle of fresh herbs for a polished presentation. These techniques ensure your rice is flavorful and memorable.

Warranty and Customer Support

Your Aroma 6-Cup Rice Cooker is backed by a 1-year limited warranty. For inquiries or assistance, contact Aroma customer support through their official website or provided contact details.

11.1 Warranty Information

Your Aroma 6-Cup Rice Cooker is protected by a 1-year limited warranty, covering defects in materials and workmanship. During this period, Aroma will repair or replace defective parts at their discretion. For warranty service, contact Aroma Housewares directly via their official website or customer support hotline. Proper registration of your product is recommended to ensure seamless warranty coverage. Retain your purchase receipt as proof of purchase, as it may be required for warranty claims. This warranty does not cover damage caused by misuse or improper maintenance. Refer to the manual for full warranty terms and conditions.

11.2 Contacting Aroma Support

For any inquiries, troubleshooting, or assistance with your Aroma 6-Cup Rice Cooker, contact Aroma Housewares directly. Visit their official website for customer support options, including live chat, email, and phone support. When reaching out, have your product model number and purchase details ready for efficient service. You can also find helpful resources, FAQs, and repair center information on their website. Aroma’s dedicated team is available to address your concerns and ensure your satisfaction. For the best experience, register your product online to streamline support interactions and gain access to exclusive updates and offers. Contact Aroma Support today for assistance tailored to your needs.